SCENERY PAINTING FOR THE AMATEUR MUSICAL THEATRE and PANTOMIME
Bob Struckman, in Sierra Paradise, CA. is building and painting the set for Agatha Christie's "The Mousetrap". This is to be performed by the Sierra Classical Theatre in Mammoth Lakes and also in Bishop. The show will be staged in both cases on the floor of a hall with the audience sitting at that same level (i.e. no raked seating) . No raked seating means you have a captive audience as the perspective eyeline will be the same for everyone. He asks about painting wallpaper, panels, and doors, and hiding the edges of the flats.
First off - hiding the edges of flats. The game is to avoid the edges being seen or at least to disguise the fact that there are edges. This is often achieved by putting lots of returns into the set. This hides the edges, especially in interior corners. Exterior corners are more of a problem but the audience accepts there will be a line at a corner. Incidentally these returns also help to strengthen and stabilise the set.
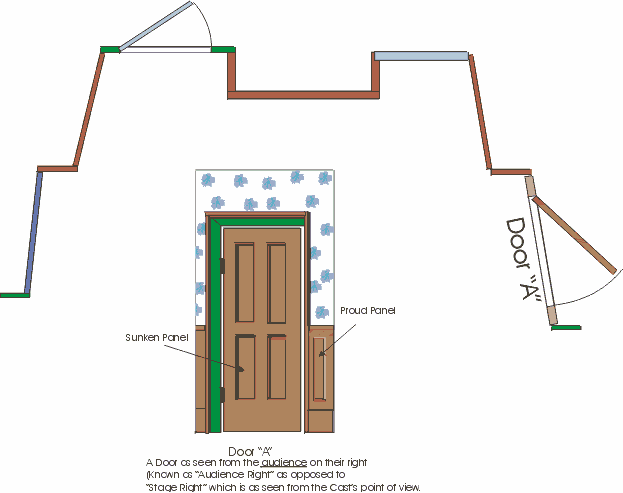
Doors. One of my pet 'hobby horses' is the lack of thickness in doors and windows which most amateur companies present to the audience. They look as if the walls have been made of cardboard. (Which of course they often are!).What has to be done is to paint this wall thickness onto the scenery This thickness in architectural terms is called a "reveal" .In the above drawing I show where I would paint a reveal for a door on the right of the audience. (in green for clarification). An audience sitting at the same height as the scenery will also see up under the reveal. See top green section. Now if this door was audience left then the painting will have to be a mirror image of the above. Does your door flat not have enough room to paint the reveal? Well, try painting it on the flat which is right beside it- often works. Now to bring the above door to life I would paint in the shadows. See my method as described in another answer. (Close separate window once finished with)
 
Panels First of all are you to have sunken or proud panels? See the above drawing for sunken panels on the door. Note where the dark strips of depth are painted. Actually I have drawn the bottom panels wrong for an audience seated the same height as the actors. The bottom door panels should have their dark thickness painted on the bottom (not top) of the panels. Sorry about - can't be bothered to change it. As for proud panels then you paint a lighter strip of colour. See panels on above drawing. Again all the above is for an 'audience right' panels. Audience left would be a mirror image. See my sketch on a previous answer (Close the separate window once finished with).

Wallpaper. I'm was delighted to read you are painting the wallpaper. Often, amateur companies actually wallpaper their canvas flats, which makes it very hard to remove when using the flats in a future production.
Decide on the base coat of your wallpaper and paint the flats with that. Then stencil on your pattern. I grew up in the 1940's in England and can tell you many wallpapers had big (overpowering) flowers on them. Say, six inches across and about one foot apart. I cut my own stencils using bought
stencil card from a local art shop. I use a craft knife to cut out the stencil. However try your local Plastic Vinyl Shop and Vehicle sign maker who often offer a cheap stencil cutting service.

In order not to be too overpowering I would choose another hue near to the colour of your base coat. Avoid any contrasting bright colours. Leave that to the people dressing the set using curtains, cushions etc. They can easily change them but you are in big trouble if the producer asks for the wallpaper colour to be changed the night before the performance! Choice of stencil flower? Up to you. I also trudge around each flower, once stenciled, putting in outlines of petals etc. I do a line at a time on each flower to ensure uniformity. But I do not use black for this task.

Finally Distressing Very rarely does any script call for a brand new interior with pristine wallpaper etc. What gives your set a lived-in look is the dusting down and distressing of the scenery. Once you have the set up and fixed together, get an old rag (or crumpled up newspapers) and scrub a dark colour along the top edges of the flats and where they join (especial on "inside" corners.) Have a rag and
some clean water handy to remove some of the "dirt" if it looks too old. Be quick in wiping it off otherwise the paint will dry. Be aware that you are planning to take your set apart and move it to another venue. This might mean it would not go together exactly as it did when you distressed it the first time. You might find you have clean lines of colour where things are not the same. Take some of that "Distressing" colour and rags etc with you when you set up the scenery at each venue to fix this problem. Or nip the problem in the bud before you even get to that stage, by distressing further into the corners than you really need when first distressing.

If you want to be excessive (but not for "The Mousetrap") then see my answer to a previous question for some thoughts. on distressing. (Close separate window once finished with)

Hope the above helps. Regards Brian

<< Return to list of questions and answers
<< Return to list of Stage Sets