This
page was last updated on
|
05-Jun-2005
|
VANISHING POINT - a description.
There are many many books devoted to the subject of perspective in art and how to achieve the illusion of three dimensions. Here is my simplified version which does not explain the theory behind the geometry but is enough to “get you through” when painting "tromp l’oeil" scenery for the theatre.
Now many scenic artists choose not to paint in this realistic manner. In which case the “rules” of perspective as explained here are not applied or at least the eye line is placed in an arbitrary position without any regard to the audience.
So off we go and remember this is about painting a tromp l’oeil stage backcloth. Things can be different for a painting destined to be hung on a wall.
Come with me in your imagination out into that “suburban back garden” we are planning to paint for this Musical. Now prop up a large sheet of glass with its base sitting on the lawn. This we call our “picture plane”. And represents your backcloth.
I have decided our “eye line” is to be three feet off the ground. The eye line used to be called the “horizon line” but that’s a confusing description when, quite often, the horizon we see in the landscape before us which we want to paint, does not coincide with the horizon line we elect to establish in our painting. (Painting amongst mountains for instance)
So “eye line” is the word used now a-days. The eye line is the position of the viewer’s eye and in this case I have decided we will assume the eyes of the audience are three feet off the stage floor. Now this is not normally the case and the eye line of an audience in a proscenium school assembly hall is more often than not only about one foot off the floor of the stage. But that position is restricting. So three feet it is.
OK lets start to draw in our imaginary garden on our imaginary sheet of glass. First thing to do is to place your eyes at the three-foot-off-the-ground position. So lets sit cross-legged on the lawn. (‘Hope the grass isn’t wet) and draw a horizontal line across the glass at the three feet off the ground mark. This is our “Eye Line”.
From now on you have to keep you imaginary head in exactly
the same position and close one eye!. No wiggling about otherwise this
project doesn’t work.
Trace the outline of, say, one of the houses on the right, onto the glass.
Put in the roofline, the eves/gutter, a couple of upstairs windows, and
a couple
of downstairs windows.
Now you can get up and stretch your legs – you have finished looking through
the glass for a while.
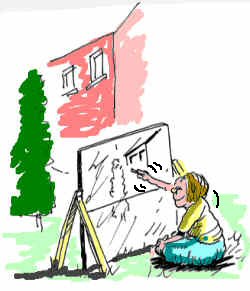
Here comes the magic bit. On the glass, construct a line to follow the roofline until it meets the eye line. Do the same with the eves/gutter and top and bottom windowsills. If you have kept your head dead still during the original drawing then all these lines will meet together at a point on the eye line. This is called the “Vanishing Point”.
Lets do the high-rise flats in the left distance next. Back to the exact cross-legged position again on the grass and once more trace the outlines of these flats. (Outline only- we are not into works of art) Again construct the lines ….to discover they meet at a different vanishing point on the same eye line. Conclusion – differently positioned buildings have different vanishing points but all have the same eye-line. Incidentally note that any vertical lines stay that way – vertical.

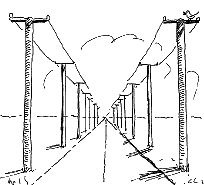 |
And the most quoted example of single point perspective? Standing in the middle of a road with telegraph poles on either side. There’s an easy way to construct where to place the receding/diminishing poles but this is not the place to go off down that road (pun intended) Here the eye line is also the horizon and of course the vanishing point is right in the middle. |
So much for single point perspective, but we see two sides of most cubed buildings and that other side also slopes, but in a different direction, and these lines converge to a different vanishing point. (See left hand side of the High Rise Flats.) 'Trouble is that second vanishing point is inevitably well off the backcloth. So when drawing out the original small sketch I usually extend the paper and construct my second vanishing point onto my extended eyeline then transfer the angles onto the backcloth just by using the squared method, not having a vanishing point to refer to.
Incidentally I have been known to use the second vanishing point when it was essential to get things right. I did that by dragging the backcloth cloth out into an empty car park and tied a very long length of string to the handle of a full, heavy, paint tin which I then placed at my vanishing point.
For vanishing points which are on the backcloth I usually tape the end of the string to the vanishing point position.on the cloth with masking tape.
Finally an exercise you can do in that quiet moment when you are sitting in the car waiting for the wife, husband, partner to finish the week's shopping. Look at the buildings ahead of you and mentally construct those lines to their vanishing point and the eye line. If you had one of those old fashioned cars with the flat windscreen you could even try drawing on the glass. See how everything relates to the eyeline which happens to be your eyeline. That bloke up there cleaning windows on the second floor has a different eyeline and vanishing points than you of course. In fact when the wife, husband, partner returns from the shopping and flumps down in the seat beside you, although she will have the same eyeline as you, she will have different vanishing points from "her perspective". That's the fun of painting scenery for the proscenium stage where the audience is sitting on the flat. They are all seeing the same eyeline although their vanishing points will be different, but no-one knows what the correct vanishing point is, so it doesn't matter),